
Infrared remote (e.g. Logitech Harmony) with Wetek OpenELEC
Wetek OpenELEC is a small box running OpenELEC. OpenELEC is a media center based on Kodi. In comparison to a Raspberry Pi running OpenELEC, Wetek OpenELEC includes a TV tuner (DVB-C/T, DVB-S oder ATSC). So you don’t have to find a compatible tuner by yourself and have everything integrated in a nice little box. Shipment includes an AirMouse. This is a remote which can be used as a mouse due to built-in motion sensors. Because I already use a Logitech Harmony as an universal remote I also wanted to control Wetek OpenELEC with this remote. Wetek OpenELEC is a special edition of Wetek Play (differences between these two). So getting an infrared remote to work with Wetek Play should be pretty similar.
The box has a built-in infrared receiver. But it is only used to power on and off the device. To actually control Kodi with an infrared remote unfortunately is a little complicated. I first describe how to simply use my configuration for a Logitech Harmony. Afterwards I show you the steps necessary for configuring another infrared remote. As a limitation your remote has to use the NEC protocol.
In order to control as many keys as possible from my Logitech Harmony remote I configured Mut@nt HD2400 as device. The Harmony configuration software also includes Wetek Play but then many keys of the Harmony do not work.

Keys and the appropriate action in Kodi are defined in the file remote.conf on Wetek OpenELEC. If you do not want to configure everything yourself like described in the second part you can simply use my file. Connect to your Wetek OpenELEC via
In addition I configured some more keys:
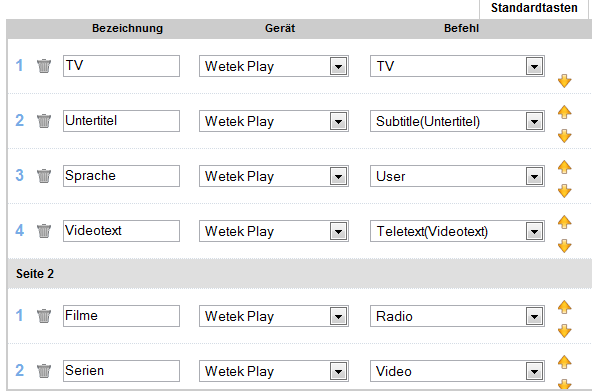
These are mapped to the Keys M, S, L, T and V in remote.conf. T and L are used to change subtitle and show teletext in Kodi default configuration. The other keys can be mapped to wanted actions with a own keymap (file keymap.xml). I configured M = “Movies”, S = “TV series”, L = “change language” and Z = “TV”. Furthermore the keymap includes keys for navigation in teletext (red, green, yellow, blue). The file keymap.xml has to be copied to
How is it psooible to configure another remote for Wetek OpenELEC? First you have to enable SSH access in the settings. The default password for the user root is openelec. Now you can press any key on the remote. With dmesg -c | grep custom you get the factory code of your remote:
OpenELEC:~ # dmesg -c | grep custom
[ 1657.693666@0] Wrong custom code is 0xe21d1f00
You have to change the factory code in the file remote.conf to match the code of your remote. You can either edit the file via SSH (e.g. vi /storage/.config/remote.conf) or use another editor on your remote computer with the help of the share
OpenELEC:~ # head -n 15 /storage/.config/remote.conf
# WeTek Play NEC remote
factory_code    = 0x1f000001
work_mode   = 1
repeat_enable   = 1
release_delay   = 150
debug_enable    = 1
reg_control = 0xfbe40

key_begin
; Code    = IR keycode
; Linux   = Linux keycode
; Android = Android keycode
; Button  = Description button on Logitech remote
; KODI    = Action in KODI (focus on video playback)
;           Further info: http://kodi.wiki/view/Keyboard_controls
To activate the changes in remote.conf you either have to reboot Wetek OpenELEc or execute the command remotecfg /storage/.config/remote.conf. For every key on your remote you want to use you have to identify the right code. To do this press the key on the remote and display the received code afterwards:
OpenELEC:~ # dmesg -c | grep scan
[ 3135.540356@0] scancode is 0x002b, invalid key is 0x0000.
[ 3135.812065@0] scancode is 0x002b, invalid key is 0x0000.

OpenELEC:~ # dmesg -c | grep scan
[ 3163.433223@0] scancode is 0x0028, invalid key is 0x0000.
[ 3163.702069@0] scancode is 0x0028, invalid key is 0x0000.
Every received code (scancode) is mapped to a keycode whcih triggers an action in Kodi. My remote.conf already includes many important keycodes like 114 and 115 to change the sound level (see also description in column “Kodi”). Some valid keycodes can be found in this list.
The keys of your remote are defined between the lines beginning with “key_begin” and “key_end”. You can adjust the lines already in the file to your needs. Just change the value in the column “Code” to match you own remote codes. Comments are defined with ; or #. Entrires for the codes from the example might look like this:
key_begin
  0x2b    114      # Vol -
  0x28    115      # Vol +
key_end
After all keys are mapped in remote.conf run the command remotecfg /storage/.config/remote.conf.
The whole process is also described in a forum article.