
NetApp vFiler DR with Data ONTAP Simulator Part 5: DNS Configuration
This article is part of a series.
Note: In case you already configured DNS settings while setting up the VMs (part 2 and 3) you can directly test name resolution with ping.
For the next steps it is advisable that both NetApp VMs are configured correctly. They should at least be able to resolve each other. If you plan to create a synchronous vFiler DR name resolution must work. If not you might get errors like “SnapMirror is unable to setup a multipath connection to vol_vfiler, resorting to the standard single TCP connection.” und “SnapMirror: destination transfer from 192.168.2.66_vfiler_con:vol_vfiler1 to vol_vfiler1 : Error in snapmirror sync mode negotiation.”.
You can choose between 2 DNS configurations: “Configuration with a DNS server” and “Configuration via /etc/hosts”. Make sure to always configure one of these options on both simulators.
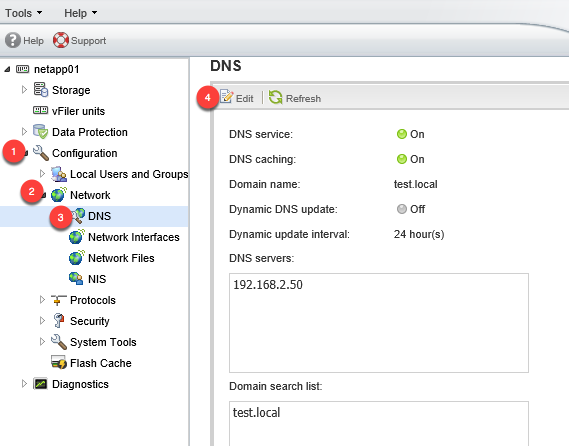
If a DNS server is available and entries for both simulators exist you can just configure this DNS server on both VMs. To do this you can use the OnCommand System manager (Configuration => Network => DNS).
If OnCommand System Manager is not available you can also configure the DNS server via rdfile and wrfile:
netapp01> rdfile /etc/resolv.conf

netapp01> wrfile /etc/resolv.conf
nameserver 192.168.2.50
search test.local
read: error reading standard input: Interrupted system call

netapp01> options dns.domainname test.local

netapp01> options dns.enable on
With rdfile /etc/resolv.conf you get the content of the file /etc/resolv.conf. Unfortunately it is not possible to edit the file. Instead you have to write the whole file. So to add a line you have to get the current content of the file with rdfile, copy it and insert the contetn of the clipboard and your new line with wrfile /etc/resolv.conf. In this case you have to add an additional line consisting of nameserver and the IP of your DNS server. To stop writing to the file just press Ctrl+C. After that you can check the new content with rdfile /etc/resolv.conf (see video below).
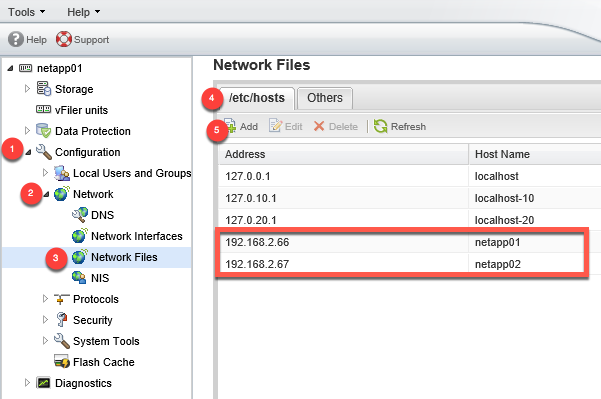
If no DNS server is available in your network or if you do not want to depend on a DNS server you also can add the IPs and hostnames to the file /etc/hosts. Again, this configuration has to be done on both VMs. You can use the OnCommand System Manager (Configuration => Network => Network Files).
Of course you can also use SSH:
netapp01> rdfile /etc/hosts
127.0.0.1 localhost localhost-stack
127.0.10.1 localhost-10 localhost-bsd
127.0.20.1 localhost-20 localhost-sk
192.168.2.66    netapp01 netapp01-e0a
# 0.0.0.0       netapp01-e0b
# 0.0.0.0       netapp01-e0c
# 0.0.0.0       netapp01-e0d

netapp01> wrfile /etc/hosts
127.0.0.1 localhost localhost-stack
127.0.10.1 localhost-10 localhost-bsd
127.0.20.1 localhost-20 localhost-sk
192.168.2.66    netapp01 netapp01-e0a
# 0.0.0.0       netapp01-e0b
# 0.0.0.0       netapp01-e0c
# 0.0.0.0       netapp01-e0d
192.168.2.67    netapp02
read: error reading standard input: Interrupted system call

netapp01> rdfile /etc/hosts
127.0.0.1 localhost localhost-stack
127.0.10.1 localhost-10 localhost-bsd
127.0.20.1 localhost-20 localhost-sk
192.168.2.66    netapp01 netapp01-e0a
# 0.0.0.0       netapp01-e0b
# 0.0.0.0       netapp01-e0c
# 0.0.0.0       netapp01-e0d
192.168.2.67    netapp02
With rdfile /etc/hosts you get the current content. Copy it and overwrite the file with wrfile /etc/hosts. Insert the old content from the clipboard and add a line consosting of the IP and hostname of the partner simulator. To exit press Ctrl+C. A short video shows the process on the second simulator (netapp02).
You can check the configuration by pinging the partner simulator on each VM::
netapp01> ping netapp02
netapp02 is alive
netapp02> ping netapp01
netapp01 is alive
All articles of the series
Part 1: Download of the files needed
Part 2: Configuration of the first simulator
Part 3: Configuration of the second simulator
Part 4: Create an aggregate and volume
Part 5: DNS Configuration
Part 6: Create vFiler and configure vFiler DR
Part 7: Synchronous vFiler DR
Part 8: Create shares on vFiler
Part 9: Planned Failover
Part 10: Disaster Failover