
NetApp vFiler DR with Data ONTAP Simulator Part 3: Configuration of the second simulator
This article is part of a series.
In general the second simulator is configured like the first one. As a main difference you have to change the serial number and system id of the second VM and use the appropiate license numbers like already mentioned in Part 1.
From the file “VSIM Licenses: 8.2.3 licenses Clustered-ONTAP” you choose a serial number matching your VMware product. In my case this is the line “Licenses for the non-ESX build (Serial Number 4082368507)”. So the serial number for the second VM is 4082368507 and the license codes are listed beneath.
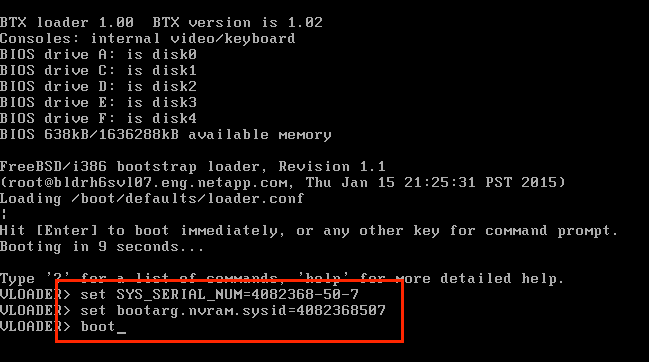
After booting the second VM you press any key (except ENTER) when the prompt “Hit [Enter] to boot immediately, or any other key for command prompt.” shows. The command prompt appears with “SIMLOADER>”. Now you change the serial number and system id with the commands set SYS_SERIAL_NUM=4082368-50-7 and set bootarg.nvram.sysid=4082368507. Afterwards restart the system with boot.
Rest of the process is like configuring the first simulator. First you press Ctrl+C, start a fresh configuration with option 4 and specify hostname and IP settings. Afterwards you can login via SSH and run the commands of Part 2. Of course now you have to use the license codes from the file “VSIM Licenses: 8.2.3 licenses Clustered-ONTAP”.
Now you have 2 Data ONTAP simulators which can be used to configure vFiler DR in the next parts coming.
All articles of the series
Part 1: Download of the files needed
Part 2: Configuration of the first simulator
Part 3: Configuration of the second simulator
Part 4: Create an aggregate and volume
Part 5: DNS Configuration
Part 6: Create vFiler and configure vFiler DR
Part 7: Synchronous vFiler DR
Part 8: Create shares on vFiler
Part 9: Planned Failover
Part 10: Disaster Failover